The Gradio Python Library
![]()
📄 Introduction
Gradio is a powerful Python library that lets users quickly create interactive web-based interfaces for your machine learning models or any Python functions. It makes it easy to test, showcase, and share your models with others, while also supporting a variety of input and output types like text, images, and audio. Gradio allows for real-time interaction, with live input-output updates, making it easy to see instant feedback. You can also customize the interface to make it visually appealing and integrate it seamlessly with popular machine learning libraries like TensorFlow and PyTorch. Plus, it offers simple deployment, letting you share your work with a broader audience effortlessly.
Gradio interfaces can be easily shared, either by hosting them locally or using third party software such as Huggingface Spaces. Gradio apps can also be integrated with external applications using its API endpoint. This allows Gradio apps to be integrated with websites and other apps to showcase Machine learning models or any python functions.
⚙️ Installation Guide
For Windows:
Gradio can be installed using pip in your command prompt, through the following lines:
pip install gradio
or
pip install --upgrade gradio
This installs the recent, most stable version of gradio, if you want to install a specific version use the command:
pip install gradio==X.X.X
where X.X.X is the version of gradio being installed.
While installing, make sure the version of Gradio being installed is compatible with the python version installed on your device. The compatibility of Gradio with different versions of python is given below:
| Gradio Version | Required Python Version |
|---|---|
| Gradio 5.x | Python 3.8+ |
| Gradio 4.x | Python 3.7+ |
| Gradio 3.x | Python 3.7+ |
| Gradio 2.x | Python 3.6+ |
| Gradio 1.x | Python 3.6+ |
| Gradio 0.x | Python 3.5+ |
For Linux:
To install gradio on some common linux distributions, we can firstly install pip separately and then use that to install Gradio.
sudo apt update && sudo apt install python3 python3-pip -y   # Ubuntu/Debian
sudo yum install python3 python3-pip -y                      # CentOS/RHEL
After this, to install Gradio:
pip install gradio
For Mac
To install Gradio on mac, open a terminal application using Command (⌘) + Space and run the following command:
pip3 install gradio
🔑 Key Features
Gradio has many important features and tools to provide the user with all means necessary to demonstrate their models or functions. Some of the key features of this library are:
1. Interfaces
Gradio allows us to create Graphical User Interfaces (GUIs) to demonstrate Machine Learning models and other Python functions. These interfaces enable users to visualize and interact with models in real-time, which helps show all of the functionalities and capabilities of the model. Gradio helps demonstrate complex models and functions through simple interfaces, allowing both developers and non-technical users to interact and use these.
Gradio interfaces support a variety of input types, allowing users to interact with models and functions in different ways. These inputs include text fields for user input, sliders for numerical values, dropdowns and radio buttons for selecting options, checkboxes for boolean inputs, and more interactive elements like image uploaders, audio recorders, and even sketchpads for freehand drawing. The outputs are have a wide range as well from simple text responses and highlighted text to more complex outputs like images, audio playback, video rendering, and data visualizations. By combining these inputs and outputs, Gradio makes it easy to create dynamic and interactive applications. Some of these inputs have been demonstrated below in the Gradio app for a Toy Calculator.
The code snippet for the following is:
import gradio as gr

def calculator(num1, operation, num2 ):
    global message
    if operation == "add":
        message= num1 + num2
    elif operation == "subtract":
        message= num1 - num2
    elif operation == "multiply":
        message= num1 * num2
    elif operation == "divide":
        if num2 == 0:
            message="Cannot divide by zero"
        else:
            message=num1 / num2
    return message

def store_message(num1,num2,operation, history: list[str]):
    output = {
        "Result": calculator(num1,operation,num2),
        "History": history[::-1]
    }
    message=calculator(num1,operation,num2)
    history.append(f"{num1} {operation} {num2} = {message}")
    return output, history

demo = gr.Interface(fn=store_message,
                    inputs=["number",gr.Slider(value=0,minimum=-100,maximum=100),gr.Radio(["add", "subtract", "multiply", "divide"]), gr.State(value=[])],
                    outputs=["json", gr.State()],
                    title=" Toy Calculator with History",
                    description="We can save the data being executed in the toy calculator through state interfaces"
                    )

demo.launch()
This demonstration highlights Gradio’s ability to create interactive and accessible interfaces, making it a powerful tool for showcasing models, functions, and applications.
2. Blocks
Gradio blocks is a much more flexible interface builder for the gradio library. It provides the user will all the tools to edit all components of the interface. It allows developers to create multi-component applications with full control over its layout, theme, data flow etc. Blocks lets users create complex workflows, chain multiple functions together, and design custom user interactions. Following are two apps made to demonstrate gradio blocks:
1. The app below shows an interface created using Gradio blocks for a random name generator app. It shows the sidebar function. In the app, users can select an option for the type of name that they want and continuously generate names without having to select what type of name they want again, i.e. function calls with certain conditions can be done without having to chose the condition everytime the function is called.
The code snippet for the above is:
import gradio as gr
import random


def generate_pet_name(animal_type, personality):
    cute_prefixes = ["Fluffy", "Ziggy", "Bubbles", "Pickle", "Waffle", "Mochi", "Cookie", "Pepper"]
    animal_suffixes = {
        "Cat": ["Whiskers", "Paws", "Mittens", "Purrington"],
        "Dog": ["Woofles", "Barkington", "Waggins", "Pawsome"],
        "Bird": ["Feathers", "Wings", "Chirpy", "Tweets"],
        "Rabbit": ["Hops", "Cottontail", "Bouncy", "Fluff"]
    }

    prefix = random.choice(cute_prefixes)
    suffix = random.choice(animal_suffixes[animal_type])

    if personality == "Silly":
        prefix = random.choice(["Sir", "Lady", "Captain", "Professor"]) + " " + prefix
    elif personality == "Royal":
        suffix += " the " + random.choice(["Great", "Magnificent", "Wise", "Brave"])

    return f"{prefix} {suffix}"


with gr.Blocks(theme=gr.themes.Soft()) as demo:
    with gr.Sidebar(position="left"):
        gr.Markdown("# 🐾 Pet Name Generator")
        gr.Markdown("Use the options below to generate a unique pet name!")

        animal_type = gr.Dropdown(
            choices=["Cat", "Dog", "Bird", "Rabbit"],
            label="Choose your pet type",
            value="Cat"
        )
        personality = gr.Radio(
            choices=["Normal", "Silly", "Royal"],
            label="Personality type",
            value="Normal"
        )

    name_output = gr.Textbox(label="Your pet's fancy name:", lines=2)
    generate_btn = gr.Button("Generate Name! 🎲", variant="primary")
    generate_btn.click(
        fn=generate_pet_name,
        inputs=[animal_type, personality],
        outputs=name_output
    )

demo.launch()
2. The app below shows how history of inputs can be saved throughout a session in a Gradio app, and then be re-used in later inputs as well.
The code snippet for the above is:
import gradio as gr

with gr.Blocks() as demo:

    tasks = gr.State([])  # Store tasks
    new_task = gr.Textbox(label="Task Name", autofocus=True)

    # Function to add a new task
    def add_task(tasks, new_task_name):
        return tasks + [{"name": new_task_name, "complete": False, "deleted": False}], ""

    # Submit button to add task
    new_task.submit(add_task, [tasks, new_task], [tasks, new_task])

    # Function to render tasks
    @gr.render(inputs=tasks)
    def render_todos(task_list):
        # Categorizing tasks into complete, incomplete, and deleted
        complete = [task for task in task_list if task["complete"]]
        incomplete = [task for task in task_list if not task["complete"] and not task["deleted"]]
        deleted = [task for task in task_list if task["deleted"]]

        # Rendering Incomplete Tasks
        gr.Markdown(f"### Incomplete Tasks ({len(incomplete)})")
        for task in incomplete:
            with gr.Row():
                gr.Textbox(task['name'], show_label=False, container=False)
                done_btn = gr.Button("Done", scale=0)

                # Mark task as complete
                def mark_done(task=task):
                    task["complete"] = True
                    return task_list

                done_btn.click(mark_done, None, [tasks])

                delete_btn = gr.Button("Delete", scale=0, variant="stop")

                # Mark task as deleted
                def delete(task=task):
                    task["deleted"] = True
                    return task_list

                delete_btn.click(delete, None, [tasks])

        # Rendering Complete Tasks
        gr.Markdown(f"### Complete Tasks ({len(complete)})")
        for task in complete:
            gr.Textbox(task['name'], show_label=False, container=False)

        # Rendering Deleted Tasks
        gr.Markdown(f"### Deleted Tasks ({len(deleted)})")
        for task in deleted:
            gr.Textbox(task['name'], show_label=False, container=False)

# Launch the Gradio interface
demo.launch()
3. Chatbot
Gradio makes it easy to build and deploy chatbots by providing interactive interfaces for handling user input and generating responses in real-time. With support for text-based inputs and outputs, chatbots can process user messages and return AI-generated responses instantly. Using Gradio, chatbots can be integrated with a wide range of AI and machine learning models. Developers can connect chatbots with different AI or Machine Learning models and create an interactive interface for them through Gradio. Gradio’s support for multiple input types allows users to interact via text, voice, or even images, making chatbots more versatile. Whether for customer support, virtual assistants, or AI-powered conversation models, Gradio provides a simple yet powerful framework for developing engaging chatbot experiences.
Below is a simple chatbot interface for an AI model.
The code snippet for the following is:
import gradio as gr

# Function to generate chatbot response and returns chat history
def chatbot(input_text, chat_history):
    response = f"Bot: {input_text[::-1]}"

    chat_history.append((input_text, response))

    return chat_history, response


with gr.Blocks() as demo:
    chat_history = gr.State([])

    user_input = gr.Textbox(label="Your Message", placeholder="Type here...")

    bot_response = gr.Textbox(label="Bot Response", interactive=True)

    submit_button = gr.Button("Send")

    submit_button.click(
        chatbot,
        inputs=[user_input, chat_history],
        outputs=[chat_history, bot_response]
    )


# Launching the interface
demo.launch()
4. Data Science and Plots
Gradio enables interactive data science interfaces by allowing users to visualize and manipulate data in real-time, making trend analysis and model interpretation more intuitive. By integrating interactive inputs such as sliders, dropdowns, and text fields, users can dynamically adjust parameters and instantly see how changes affect graphs, predictions, or statistical outputs. Gradio supports real-time data visualization through libraries like Matplotlib, Plotly, and Seaborn, enabling users to explore datasets, observe trends, and compare results interactively. This helps users obtain results and interpret trends in data instantaneously, without having to wait/create separate programs for different cases.
1. Below is a demonstration on how Gradio interfaces can be used to get live updates on trends. The app shows how different input methods can make graps more interactive and how trend changes can be analyzed through this. The app allows users to visualise how sine waves change by changing parameters such as the amplitude and frequency.
The code snippet for the above app is:
import gradio as gr
import numpy as np
import matplotlib.pyplot as plt

# (1) Function to Generate Plot Based on User Input
def plot_function(amplitude, frequency):
    """
    Generates a sine wave plot based on user-selected amplitude and frequency.
    """
    x = np.linspace(0, 10, 400)  # (2) X-axis values
    y = amplitude * np.sin(frequency * x)  # (3) Compute Y values for sine wave

    # (4) Create the plot
    fig, ax = plt.subplots()
    ax.plot(x, y, label=f"Amp: {amplitude}, Freq: {frequency}")
    ax.legend()
    ax.set_xlabel("Time")
    ax.set_ylabel("Amplitude")
    ax.set_title("Sine Wave Plot")

    return fig  # (5) Return the generated plot

# (6) Creating Interactive Gradio Interface
plot_interface = gr.Interface(
    fn=plot_function,  # (7) Connect function to UI
    inputs=[
        gr.Slider(1, 10, value=5, label="Amplitude"),  # (8) Amplitude Slider
        gr.Slider(1, 10, value=2, label="Frequency")   # (9) Frequency Slider
    ],
    outputs=gr.Plot(),  # (10) Output as a Plot
    live=True  # (11) Updates the plot in real time
)

# (12) Launch the interface
plot_interface.launch()
2. The app below shows how changes in itrends can be visualised through Gradio interfaces. This shows it’s real life applications as much larger datasets and much more complicated computations can be carried out and displayed through similar interfaces.
The code snippet for the above app is:
import gradio as gr
import pandas as pd
import numpy as np

# Sample DataFrame with Age, Weight, and Height
# You can replace this with your actual data or load it from a CSV file
data = {
    'age': np.random.randint(18, 65, 100),
    'weight': np.random.uniform(50, 100, 100),
    'height': np.random.uniform(150, 190, 100)
}

df = pd.DataFrame(data)

# Gradio Dashboard
with gr.Blocks() as demo:
    with gr.Row():
        # Inputs for age filter
        min_age = gr.Slider(minimum=18, maximum=65, step=1, value=18, label="Min Age")
        max_age = gr.Slider(minimum=18, maximum=65, step=1, value=65, label="Max Age")

    # Filtered DataFrame Function
    def filtered_df(min_age, max_age):
        filtered_data = df[(df['age'] >= min_age) & (df['age'] <= max_age)]
        return filtered_data

    # Scatter plot between Age and Weight
    gr.ScatterPlot(
        filtered_df,
        inputs=[min_age, max_age],
        x="age",
        y="weight",
        title="Age vs Weight",
        color="height",  # Color points by height to add more dimension
        show_legend=True
    )

    # Line plot between Age and Height
    gr.LinePlot(
        filtered_df,
        inputs=[min_age, max_age],
        x="age",
        y="height",
        title="Age vs Height"
    )

demo.launch()
🔧 Additional Features
The following are some more additional features of the Gradio Python Library
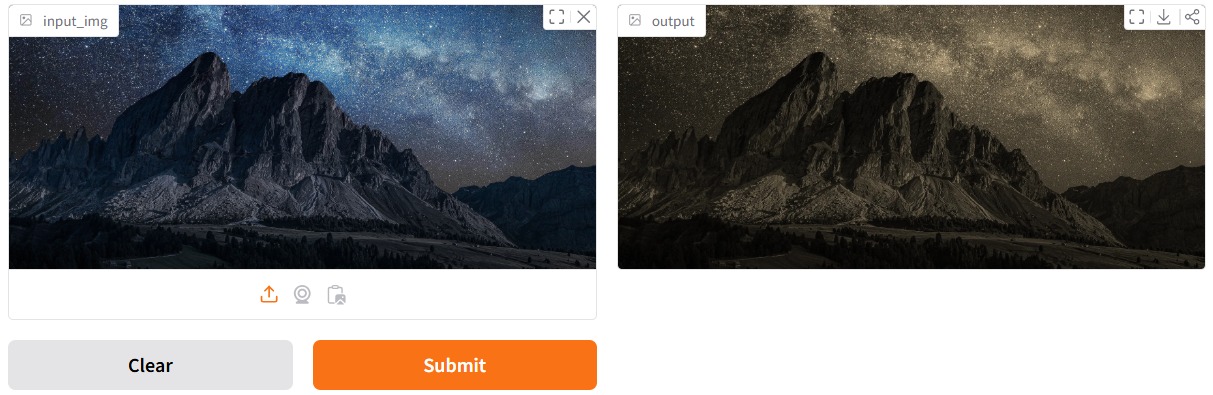
1. 🖼🎙🎥 Image, Audio, and Video Input/Output in Gradio.
Gradio makes it easy to handle image, audio, and video inputs/outputs, allowing you to build AI applications for computer vision, speech processing, and video analysis.
Images –> Classification (Image to Text) and
Transformation (Image → Modified Image & Text)
Audio –> Speech-to-Text (Audio → Text) and vice-versa
Video –> Video Playback (Video → Video) and
Extract Video Frames (Video → Image)
We can also transform images with the help of Gradio (The above transformation was brought about with the help of NumPy arrays). Gradio handles the preprocessing and postprocessing to convert images to NumPy arrays and vice versa.
2. 📡⚡📺 Streaming.
Streaming in Gradio allows functions to continuously return partial outputs while processing, instead of waiting for the full computation to complete. This is useful for chatbots, real-time inference, and long-running tasks. It has applications in AI-generated text, Real time object detection and speech recognition using YOLOv10 and Transformers ASR Model, Object detection in videos using RT-DETR, Conversational Chatbots etc.

3. 🛠 Custom Components.
Gradio allows you to create custom components by subclassing existing Gradio components and modifying their behavior, appearance, or functionality. You can publish your components as Python packages so that other users can use them as well. Users will be able to use all of Gradio’s existing functions, such as gr.Blocks, gr.Interface, API usage, themes, etc. with Custom Components. It helps in reusability and UI customization, useful for styling, setting defaults, and enhancing functionality and You can extend built-in Gradio components with additional properties.
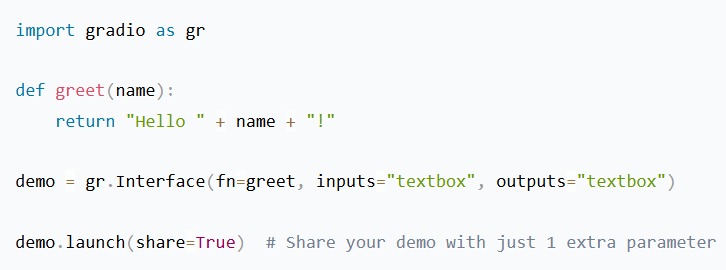
4. 📤 Sharing.
Gradio demos can be easily shared publicly by setting share=True in the launch() method. If you’d like to have a permanent link to your Gradio demo on the internet, use Hugging Face Spaces. Hugging Face Spaces provides the infrastructure to permanently host your machine learning model for free!. You can put an authentication page in front of your app to limit who can open your app. With the auth= keyword argument in the launch() method, you can provide a tuple with a username and password, or a list of acceptable username/password tuples.
5. 🤖📊🔧 ML Frameworking.
Gradio supports multiple machine learning (ML) frameworks, allowing users to quickly deploy models with interactive UIs such as TensorFlows and PyTorch for image classification, Text Summarization using Hugging Face Transformers, Chatbot using OpenAI API, etc.
6. 📡 APIs.
APIs are mechanisms that enable two software components to communicate with each other using a set of definitions and protocols. Gradio library has a various variety of such apis. For example, gr.Interface(), gr.Blocks(), gr.State(), gr.launch(), etc.
🛠 Practical Applications
1. 🖥 Interfaces Gradio’s gr.Interface() makes it easy to create web-based UIs for AI models, ML applications, and interactive tools. It allows users to interact with models through simple web interfaces.
2. 🤖 AI-Chatbots Gradio makes it easy to build and deploy AI-powered chatbots for various real-world applications. They can be used in various fields for example: Customer Support Automation, AI Chatbot for Healthcare, AI Tutoring & Educational Chatbots, etc.
3. 📸 Image Processing & Computer Vision Gradio makes it easy to deploy image processing and computer vision models with interactive web-based UIs. It can be used for Face Detection & Recognition, Object Detection, AI-Powered Image Classification, etc.
4. 🎙 Speech Recognition & Audio Processing Gradio simplifies speech recognition and audio processing by providing an easy-to-use UI for deploying AI models. For example: Speech-to-Text, Language Translation for Speech, etc.
5. 🎥 Video Analysis & AI-Powered Surveillance Gradio enables easy deployment of AI models for real-time video analysis and surveillance applications. For example: Real-Time Object Detection in Surveillance, Face Recognition & Person Identification, Crowd Counting & Density Estimation, etc.
🏁 Conclusion
The Gradio Python library provides developers with powerful tools to create GUIs for their Machine Learning models and other Python functions. These interfaces are more interactive and responsive allowing developers to obtain real-time outputs and feedback for their models. Gradio allows for users to use a multitude of input and output formats, this allows developers to fully demonstrate their models through these various input and output formats and users to experience the complete functionality of these models/functions.
Gradio blocks puts all the control in the developer’s hands, providing features like multi input-output methods, chaining of functions together, history saving throughout sessions, complete control of the interface for customisation and much more. This allows developers to fine-tune their models interface according to their needs to demonstrate their models/functions in the best way possible.
The demonstrations provided in this blog highlight the versatility of Gradio, showing how it can be used for chatbots, data science interfaces, and more.
📝 References
-
Official Documentation Link - Official Gradio documentation
-
YouTube Video Link - A Gradio tutorial by AssemblyAI
-
YouTube Playlist Link - A Youtube Playlist for Gradio tutorials by 1littlecoder
-
Link to source - Reference to image used in Streaming subheading of Additional Features